My first official cyclocross season came and went without amounting to much of anything. I found a bike in September, just before the season’s first race. Finding the bike had been a challenge of it’s own. Let me put it this way: had there been a handful of cyclocross bikes to choose from, I may not have ended up with the one I’m riding. Don’t get me wrong, it’s a great bike, but it’s mine simply because there wasn’t another choice. There just aren’t many bikes available in the small size I ride, which is probably fodder for another blog post. Nevertheless, I finished a couple of races and then experienced a series of flats which resulted in a few DNF’s (Did Not Finish).
Since I had only one wheel set, I very quickly found myself in a place where I needed to make some changes to said wheel set in order to get back into the races AND finish. The choices were 1. to use a conversion kit on the stock wheels that would result in a tubeless setup or 2. to upgrade the wheel set to a tubeless ready system. In other words, choice 1 costs around $80 and choice 2 closer to $500 and up. Since I wasn’t sure how long I would keep the bike, I decided to go with choice 1 and consider choice 2 next year after I had a few more races under my belt and a better sense of whether I wanted to keep the bike.
After doing some web searching, watching videos, and reading step-by-step instructions, I was confident in my (husband’s) ability to successfully complete the conversion under my supervision*. The Stan’s No Tubes web site even states “Converting requires very little mechanical ability but it is important to follow the Instructions.” I was confident that even a non-bike mechanic gal like myself could supervise this project flawlessly.
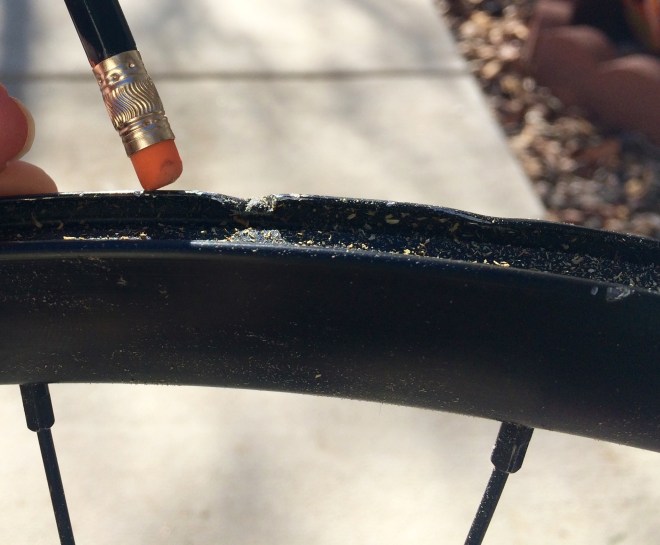
I purchased the cyclocross conversion kit. The process of cleaning the wheel, drilling the valve hole, and applying the rim tape was easy enough. The problem we encountered was that the rim was chewed up enough to leave a gap large enough that the rim tape, tire, and sealant combined weren’t enough to close that gap. Yes, we tried the compressor. It resulted in a shower of Stan’s sealant all over a friend’s garage before we finally gave up. Here’s an image of the rim to give you an idea of the kind of ding that prevented this conversion from working.
I wish the very thorough instructions and videos on the Stan’s web site would have mentioned that your rims need to be ding free in order to work with the conversion kit. Unfortunately for me, the conversion kit was a failure and waste of money. On the bright side, I have a sweet new wheel set on a bike I may or may not keep and another wheel set that is very likely to become wall art. I’d say everyone won in this case!
*Disclaimer: I’m not a bike mechanic. I don’t even play one on TV. But I do have a very handy husband who helped me with the conversion.
